Friday, August 8, 2008

The Calm Before the Sto.... I mean FUN!!!


We're pretty much just wrapping up small details at this point in preparation for our two week family bike tour. It was rather entertaining when Nickie and I were wrapping up the night before last and we started to list off all the major preparations we've made in the last 1.5 months to get ready for our trip through the Colorado Rockies. All I have to say is PHEW!!!

Things we've bought (excluding materials for things made by us:

  • Wide loaders for the llama
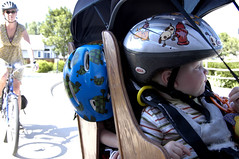
  • Extra sunshade for the kids on llama
  • Various spare bike parts (brake pads, tubes, etc)

Things we've made (this list is a bit more extensive):

  • Ultralight down bag for our toddler, good to about 15F and weighs 8oz.
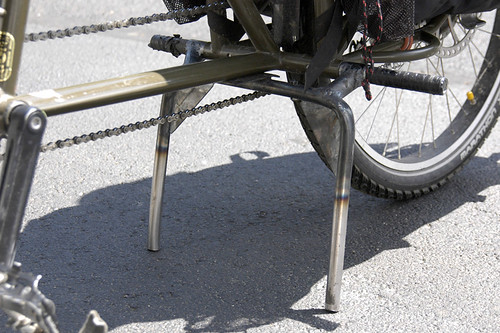
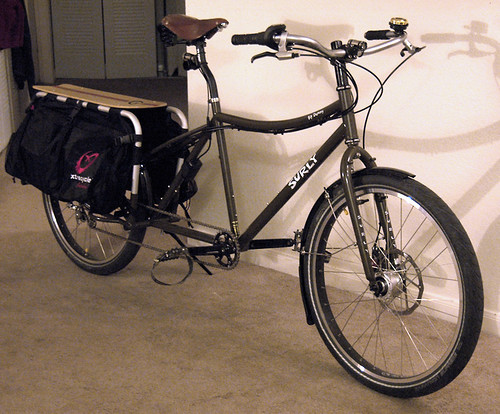
  • Centerstand for the llama much better stability when (un)loading kids and gear on all types of terrain.
  • Rain cover for the kids on the llama
  • Two 60L rolltop waterproof duffels out of silnylon, weigh about 5oz a piece.
  • Made some improvements to our ultralight two person (plus baby) down quilt just under 3lbs. including stuff sack and also good to 15 degrees
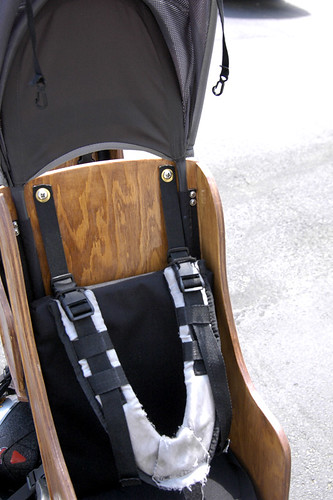
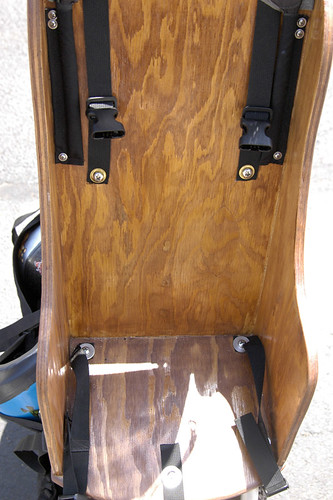
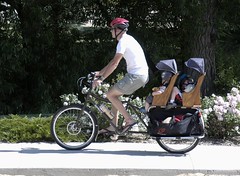
  • Snapdeck kid seat with sunshades, weighs about 15lbs which is 15lbs lighter than trailer, lower rolling resistance, single track, allows conversation with kids, and more aerodynamic.
In truth, while this is all part of preparation for the trip, much of these things were part of our ultimate transportation direction with the kids for the next few years.

We've made lists, lists, and more lists, crossing things off, adding new things on. Its been a refining process, but our aim was to have a couple days before leaving to actually just chill so we're not starting out ragged.

So back to the title, preparations are now winding down and the remaining items on the list get more and more minute and less critical if we decide to scratch and just chill till departure day.

All the weight saving measures and ultralight gear construction has paired our total gear/food/diaper weight (for 2 days without restocking) down to just under 40lbs, which all said and down is at least 25lbs lighter than our first couple camping trips up to the mountains by bike.

So onto the tour itself...

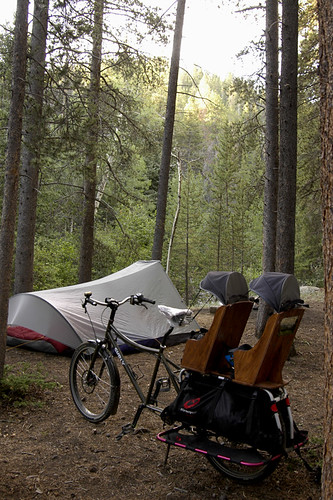
We're taking two weeks to ride up from Longmont towards Rocky Mountain National Park, up over trailridge road, down through Granby, over to Kremmling, down South ultimately to Keystone. We'll be meeting up with family there for a couple days, then turning around and heading back the way we came unless we change our minds.

The route involves three significant days of climbing with somewhere in the ballpark of 13,000ft of total elevation gain and just shy of 370 miles of riding.

Generally what we've found works best with the kids is to do a 1-1.5 hour riding stint right after breakfast, then stop someplace convenient and play with the kiddos for a couple hours, eat snack and lunch, then hang out another 45mins-1.25 hours and then load up for another 1.5 hours of riding during their usual nap time. Between those stints we can cover all planned mileage most days, except the 3 days of heavy climbing. Those days we'll be waking the kiddos early giving then a quick snack and loading up so we can get some riding under our belts before they fully wake up, then the rest of the schedule is pretty much the same.

Tuesday, July 22, 2008

Bike camping at its finest


Bike camping at its finest, originally uploaded by stoutag.

We took our first bike camping trip with the kiddos this last weekend. It was beautiful, fun, and a lot of work ;)


We rode up Lefthand Canyon past Jamestown and hit a singletrack trail up over the crest around 22 miles up from Longmont, 8,400ft elevation, and rode down to where we setup camp.


A couple years ago when we first braved backpacking with out older child, our first trip was unforgetable on more than one front, but the one that comes to mind is the overpacking first time parent, who in this particular case happens to be be carrying *everything* on their own back. Thus we were propelled into the lightweight backpacking age after lumbering up a 6 mile hike in with somewhere around 70lbs worth of stuff for an overnight stay in a mountain meadow. By the end of that summer through many steps we'd widdled our weight down to a much more manageable 30lbs or so for food and gear for the whole family


Now after last summer off from mountain adventures from a then pregnant wife, this was our first time back up, and this time, with two kids and doing it via bike as a now car free family.


In some ways it definitely reminded me of that first time backpacking. There's just no way around it, riding up 3,500ft with a load of kids and gear is not easy. Is it worth it? I suppose that depends on who you talk to. To us, yes, although it makes me think about getting that electric assist up and running on the llama sooner than later ;)


When we got back on Sunday, after settling back in and unpacking a bit the first thing we did was reevaluate the loads, and start to trim the fat. After much calculation and brainstorming we figured ways with a bit of gear making and a bit of creativity to pare our loads back by around 16lbs, which leaves our current total gear/food weight for an overnight at somewhere around 45-50lbs for the whole family.


We'll hopefully get in another overnight camping trip at least once in the next two weeks just to iron out a few more details before we head out on a 2 week bike tour with the kids up through the Rockies.

Sunday, July 6, 2008

Centerstand


Centerstand, originally uploaded by stoutag.

I couldn't wait any longer for Xtracycle to release their centerstand, nor could I justify paying almost 400 for one when I have the tools to roll my own, so thats what I did.


It is amazing just how much of an improvement this is. Now loading and unloading large loads and kids are total no-brainers.


I borrowed from some design points from xtracycle's interbike model, and improvised the rest myself. It clears the chain and all other obstacles and is easy to deploy and store being spring loaded.


I still need to paint it, but wanted to give it a bit in use before doing so. I also still need to weld feet on it. Ultimately it'll mount via the wideloaders coming in the mail next week. In the interim I took some rigid conduit and put them in as stubbies to hold it in place.

Kid seat details

Pics of the details.


Here's a seat with padding, straps and sunshade installed. The sunshade is slid up a touch in its sleeve so you can see the upper portion of the adjustable shoulder straps. All straps mount to the seat have tee-nuts from the back side for a very secure flush mount.


Here's a closeup of the sleeves for the sunshade stays, and the adjustable shoulder strap setup.


This is the seat with pads out so you can see how all straps are fastened.

Thursday, July 3, 2008

The American Moederfiets (mother bike)

Resized_DSC7103
Or in this photo, Father bike


We finished building the kid seats complete with sunshades.

We used 12mm marine plywood for its waterproof glue (avoid delamination if an edge gets chipped then wetted. I pre-drilled a ton of holes on each junction so as not to split the wood when screwing. I striped the mating edge with gorilla glue then screwed together. So all said and done the bonds should be quite strong.

The order of assembly was seat back to wedge shaped rear facing support. Then I attached the sides drilling from the backsides of the seats, so that the upper portions of the seats were fully assembled. Then I lined them up on the base, clamped, pre-drilled, glued and screwed the uppers down to the base.

ResizedDSC7134

Some tips on working with marine plywood, its has more plys for a given thickness, and consequently requires some extra care in working with it. We clamped a backer lock for all holes drilled through the wood such as for the tee nuts, otherwise it will blow out the backside and make a mess of splinters. Also you have to be real careful sanding the edges or routing to avoid splintering it. I even had to saw away from the grain line and use very sharp finishing blades to keep from chipping it like mad.

For the straps I had a local shop put metal grommets in webbing so that I count mount tee-nuts from the back sides for a threaded insert then use a fastener to mount the straps via the metal grommets. Its all VERY secure.

The assembly and prep sanding of the seats took the better part of a day with my wife and I working largely together. The puttying, further sanding, staining, varnishing was done in a little bit of free time here and there over the following week. Exactly one week after starting, we were assembling it on the bike and putting the finishing
touches on it.

The pads are a cordura covers that my wife sewed with a combination of a closed cell foam backing and an open cell foam upper for breathability and shock absorbtion.

Resized_DSC7083

Thursday, May 15, 2008

The llama


We got all the parts in for the Big Dummy build, and got it up and running a little over a month ago.

I can confidently say, besides the trailer which opened us up to riding with kids, this is the next best purchase we've made bicycle-wise. I can also say that if I'd known 8 years ago what I do now. I would have built something like this when I sold my car and went to two wheels. Although admittedly, the Big Dummy was not available, neither was the Nuvinici hub, and disc brakes have come a long ways in that time as well. So I suppose I did the best I could with what was available at the time.

To start, we named it the llama, as its a bit of an on-running joke between Nickie and I. She's joked about how great it would be to have a llama so that when we go backpacking the llama can carry the kids instead of us. Me being a little more pragmatic, and having less of an infatuation with animals decided that the cargo bike was a much better, lower maintenance option than the wooly variety of llama.

As for my impressions so far, it is remarkable how much less strategic this bike makes living car free. My wife and I had gotten rather accustomed to running errands strategically such that we could make the most of the cargo capacity of the kid trailer. This bike however makes that all a moot point. It can carry twice as much weight as the chariot trailer and far more volume. I've already toted a couple loads that friends with cars have commented "I'd have a hard time fitting that all in my car!!".

The remarkable thing is how seamless it is. What I mean by that is how little difference there really is between it and a "normal" bike, and how little difference there is with this one when loaded vs. not. When I am making use of its cargo capacity, for example carrying 50-60lbs of groceries, I have to remind myself that its even back there, and the only time it is felt while riding is out of the saddle or climbing a stiff incline. Otherwise you could ride along blissfully unaware that there's even a load behind you.

Many, (including myself prior to owning one) ask how much it affects your speed or overall ride times. Going back to the seamless comment, it once again is genuinely surprising how well it hold its own despite all the added utility. My commute time one way on my race focused road bike was pretty consistently around 31-33mins for my 11.3 mile commute. Now riding my big dummy for everything with 26"x2.0"(schwable marathon supremes) my commute now takes between 34-38mins. That basically boils down to a 10% difference in speed between this monster of a bike that weighs more than twice as much as the road bike and has monstrous rims, tires, cargo capacity and a bolt up-right riding position.

We purchased this bike with two-fold intentions, one it just seemed a no-brainer living without a car and having a family, two these bikes seem to be pretty much the best human powered option for taking kids and gear any considerable distances and for any off-roading with those same kids and gear (most of our favorite hiking trails in the nearby mountains require some off-roading to reach).

Consequently we have not fully realized the second portion of this as I haven't yet built the kid carrying snapdeck. I'm blatantly copying a fellow xtracycle lovin parent. The image below is basically where I'm going with this. Thanks Mark!!!

Thursday, March 27, 2008

Surly Big Dummy

Nickie and I had come to the conclusion awhile back that an Xtracycle was a "when" type purchase, not an "if".

I had developed quite a distaste for some cheap panniers I'd purchased last fall. They had a propensity to hop off my rack on the bumpy winter road accumulation, or any bump for that matter.

Consequently I began looking into a nicer set with retention qualities. When analyzing the price of a good set of voluminous panniers like ortlieb's my wife pointed out that this was well on the way to an xtracycle kit which was on our eventual hit list.

Well one thing led to another and in the end we managed to thoroughly justify a Surly Big dummy and put money down on one earlier this week. Lucky us we happened to get our hands on one of the last ones available in the country.

It will be showing up this coming week and we'll be working towards setting it up for serious kid-toting, mountain going fun. Honestly at this age range for the kiddos, our chariot trailer still has many benefits for portage around town, but the Big Dummy makes trips into the mountains and up 4x4 roads much more doable.

My build out will incorporate:
Nuvinci CVP
Shimano disc dynamo hub
Alex DM24 rims
Schwalbe Marathon XR's (likely the 2.25" variety)
Winzip's Santana comissioned tandem disc brake for the rear
Avid BB7 for the front
My beloved Brooks Champion flyer saddle
Nitto Albatross bars
Chris King Headset
Phil Wood Bottom Bracket
Bobike Maxi + for carrying the younger kiddo, and a built-in seat on the snapdeck for the older kiddo

It should be in Tuesday of this coming week and once I've prepped the frame and started building I'll try to post some pics and progress up here.