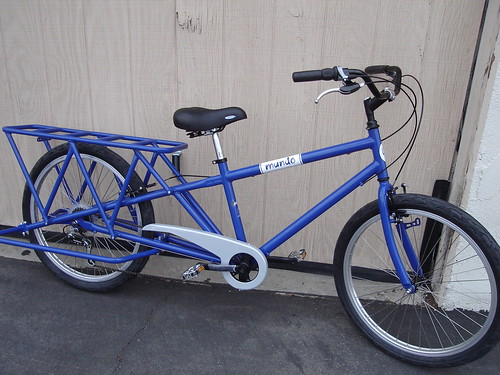
Thursday, April 16, 2009

Bike Move!!!!

Photo courtesy of www.streetfilms.org


Well its looking like we're actually going to close on that house, only 2 months later than we initially planned. I guess the news was accurate in stating that the pendulum had gone the other way and that banks are slow and SUPER cautious about lending money...

Anyway, on to the point, at this point we're leaning strongly towards a bike move. I know we've got some Longmont and Boulder readership, so if any of you local folk would be interested in doing a bike move across town with us (around 5 miles) on a weekend about 3 weeks out, please either comment here or email us.

If you don't have a bike that can carry stuff, we do have at least a couple friends with either trailers or cargo bikes that are at our disposal for this move.

Of course yummy food will be provided, likely some kind of breakfast treats, and pizza round lunchtime.

The good news is that most of the route we'll be taking is a very very gradual downhill, AND about 1/2 to 2/3rds of the route will be along path (st.vrain greenway).

Thanks!!!!!
Anthony

Saturday, March 28, 2009

A Chariot For All Seasons


This post is a little overdue, but perhaps it will be of use to someone for next year... After using the Chariot kid trailer last winter, we decided it needed a little modification for winter use. The main issues we had with it were the lack on insulation for cold weather. The really cold wet rain would saturate the fabric on the bottom of the trailer and then saturate Samuel's pants, making for a very cold little boy. Also, he would kick it open and then cold air would flow right threw and we'd have to stop, velcro it closed and keep going, then repeat all over. In the snow, when there wasn't precipitation to wet the bottom of the chariot, the cold would get through the fabric and chill the kiddos. This isn't really a design flaw in the Chariot, I understand that it's not designed for the kind of use we put it through. We needed to modify. I was shocked at how inexpensive (free) it was to modify it! We had all the necessary materials laying around and even if we hadn't, the materials were not too bad. :)

For insulating the bottom of the Chariot, we took 3 double thick strips of closed cell foam and encased them inside a double thick layer of polar fleece. Construction is simple. It's essentially a giant rectangle of fleece with the foam inside. The closed cell foam is unique in that it is really stiff and doesn't compress flat and so it makes a really good insulator. We put a nylon panel across the bottom so we could easily wipe off boot grunge. We then encased a double layer of 6 oz Primaloft in down-proof nylon to make a super warm quilt and attached this too the bottom of the insulated fleece/foam panel. this way you can flip the blanket forward, insert kiddos without dropping the blanket on the dirty floor and then flip the blanket back. We made this blanket extra wide so as to tuck in around the sides of their hips where there is no insulation. To block the draft through the netting at the back, we just stuffed a down jacket in the back pocket. Finally, we attached a hook to the velcro and tied some shock cord around the front wheel attachment place to secure the Chariot closed, so no more kicking it open. :) In reality, we only had to use this a few times until the little guy gave up. It's nice to have that secure closure as an option though, in case there is cold weather and a child gets into a "kick the door open" mood.

We've used this set-up all winter in Colorado. The coldest rides were about 4 degrees Fahrenheit for extended periods of time (1.5 hrs +) and the kids are so warm, they are taking off their mittens! Yay! One nice thing about the trailer in the winter is that it can't fall over if I do. This makes me more relaxed in the ice, even though it's highly unlikely that I'll fall with all the studs on the tires and the slow speeds I carry. The down-side is that it can be very slow in deep snow. With the motor working again I don't worry about it as much though!

Happy modifying!

Nickie

Monday, January 26, 2009

Yuba Mundo - wow...


Nickie and I swung over by a friend's place this last weekend who's starting up a local Yuba distribution channel. He's another avid bike lifestyle advocate with kids and all.

He's been using an xtracycle for awhile now as his primary car replacement, but was considering a big dummy to upgrade the capacity and handling characteristics, but not long after he decided not only to go for a Yuba Mundo instead, but also to give it a go at starting up a side business to help folks get over the car habit by selling relatively inexpensive car replacement cargo bikes and an e-assist as an option.

Hence his new business. He got his first Yuba in last week and consequently we stopped by to check it out. All my wife and I could both say was "wow...". First I took it for a real brief spin around the block and was thoroughly impressed with how smooth and efficient the ride was. I was actually say it was better than the Big Dummy. Then I had my friend hop on the back and took another spin. Absolutely no flex at all. I stopped back by his driveway and asked my wife to hop on as well. Even at this point there was no flex at all!!! As soon as I was above 5 mph they might as well not have been there. We love our Big Dummy and are truly grateful for how it has facilitated this lifestyle, but I must say after that test ride and me riding passenger for my wife to get a sense, plus a couple hours looking over the bike, this thing is in a whole nother league when it comes to carrying consistantly larger loads.

Our base weight with the llama is around 85-90lbs when you include the two kids, kid seat and diaper bag. with that load, the big dummy is certainly better than the xtracycle kits I've ridden, but its not hard at all to induce flex on the frame. With the Yuba, I had over 300lbs of payload and there was still no perceptable flex. Despite this bomber rigidity, the real suprise was just how smooth it is to ride. I was truly the silkiest ride I've ever felt on a bike, yet not slow at all for a cargo bike.

This may come as shock to many, but we are now plotting our move to a Yuba from the Big Dummy. The way that it handles the heavier weight, plus the larger cargo area in the rear, thoroughly won us over. I must admit that I also love that it comes with a proper seat tube angle for a cargo bike right out of the box.

Cheers,
Anthony

Thursday, January 1, 2009

Whole Wheat No Knead Bread

I was looking for an easy way to make bread and came across this article and this video from the NY Times.  It's easy, but didn't work well with whole wheat flour.  After a little research and tinkering (thanks Anthony) we've come up with a recipe that works for whole wheat flour.  I now use this as our primary bread.  It's good for sandwiches and takes very little time.

Whole wheat flour, as I discovered, absorbs more water than white flour because of the bran.  So if you use the online recipes for white flour, the dough doesn't rise properly.  The yeast needs room in the dough to move around, so if the bran absorbs all the water, the yeast doesn't propagate well.  So the biggest difference between my recipe and the white bread ones is an increase in water.  I also don't let this dough rise as long as the white flour recipe as it yields a more fermented taste which I don't think fits the sweetness of the whole wheat too well.  I'll include the recipe and the link for the method.

You'll need a cast iron pot with a lid (Dutch oven).  Mine measures 9" wide by 3.5" deep.

470 grams whole wheat flour, the one I like is quite fine but not as fine as pastry flour.  The fineness of the flour will effect the amount of water needed.

585 grams water (about 2 2/3 cups) at about room temp.

1/4 tsp yeast

1/2 tsp salt

1 T honey or sweetener of choice.  (I've used molasses successfully too).  I dissolve this in the water.


Lots of flour for folding the dough.

Ground flax or cornmeal for dusting.

Combine all ingredients in a bowl and cover except the folding and dusting flours.  The consistency of the dough should be like wet cement.  You just stir it all up with a spoon.  Stir it really well. Allow the dough to rise at room temperature for 7-12 hours.  When the dough fills the bowl, spread a thick layer (about 1/4 inch) of flour on a clean surface.  You'll want to start your oven preheating to 450 F with the Dutch oven in the oven.  Pour the dough out onto the flour.  Sprinkle the dough with flour and spread it out into a circle about 12-14" wide and about 1.5" thick.  Fold the dough in thirds like a business letter.  You'll now have dough that is long and skinny.  Fold the long ends in toward the middle so that you have a square or round ball.  Lift the ball into a bowl that is lined with a clean cloth napkin or dishtowel that has been heavily dusted with cornmeal or ground flax seed.  The dough will be super super soft and wet and you'll have to move it really fast or it will slip through your fingers.  At this point you can either bake it right away or wait an hour.  I think it's better if you wait, but you don't have to if you're in a hurry.  Lift the napkin out of the bowl and gently roll the dough into the pot. Put the lid back on and set the timer for 40 minutes.  Take it out and let it cool.  It needs to cool before bagging.  The bread doesn't cut too well when it's hot, although who can resist a taste?!  I refrigerate my loaf to slice it and then leave it out in a bag on the counter.  It stays good for about 3-4 days.  If I'm waiting longer than that I'll refrigerate it until we're ready to eat it or it will get a fermented taste.

The Dutch oven creates a humid atmosphere while baking that creates a superb crust and nice texture to the loaf.  Happy baking!

Monday, December 29, 2008

More Yurt Pictures


Here's two pictures, one from the front and one from the back of the completed bike yurt.  Thanks to everyone who's checked it out :) Happy Holidays. 

The things on the bars are poggies.  Anthony was sewing them late into the night for a surprise Christmas gift for me!  I call them "hot chocolate" because they keep my hands so warm, it's like holding a warm cup of hot chocolate on a cold night!  More on the poggies latter.  

A Bicycle Yurt


Stepping away from the dinning room table covered with conspicuous amounts of white fuzz (primaloft), I emerge a "gear elf" triumphant.  To say that the bike yurt is by far the most difficult thing I have ever made is quite the understatement.  The only thing I've made that took longer and more work were my children!  But three weeks of late night sewing vigils has now paid off.  The bike yurt is done.  

I based the pattern off of our rain cover pattern and added 8 inches to the bottom so that it goes clear down to the wide loaders.  There is a liner and a shell with insulation inbetween.  So the shell pattern had to be widened by 3.5 inches across the top to allow for the lofting of the insulation.  I also shrunk the windows to keep the warmth in.  I just cut about 5 inches off the bottom of the window pattern.  The yurt is constructed of Event, a waterproof breathable fabric which takes breathability to new levels.  Most breathables have to let the moisture condense on the inside before evaporating it to the outside.  This one allows vapor to pass directly out of the garment (or yurt for this matter).  It has 2.5 inches of primaloft insulation all around.  This places it at approximately R7 for insulation.  The windows are double paned thick vinyl with an 1.5 inches of dead air insulating between them.  It's warm, really warm.  This weekend only dished out weather in the 20 degree range, but the kids were warm and toasty.  Anthony had to ride the Big Dummy with the kids on it, as my shoulder is still not strong enough to handle the bike with the kids and the gear and the dog on it.   He said it handled quite well and the ability to have the kids on the Llama means that we can bring the dog in the trailer and get to Grandma and Grandpa's house for Christmas without one of those stinky, dangerous, expensive, ugly things with 4 wheels!  ;)  We also added some 3M Scotchlite to the sides, so it is very very visible.

The hardest part of the construction?  Sewing the lining between the double paned windows.  There is no room for the machine to get in between the two windows, so I had to hand-stitch between the two windows on the second window to be sewn into place.   There were so many thick heavy layers of fabric that my fingers were raw, even with a thimble.  The second hardest part: fabric management.  Oh my goodness, that is on big heavy piece of fabric as it starts to come together.  It was too heavy for the machine to feed it through, so I had to do that by hand.  The third hardest part:  the zipper.  There were 6 layers on one side of the zipper and 8 on the other.  Not all of them had to be sewn together at once, but I had to figure out what order to sew them in so as not to sew myself into a "corner".    But it is done and I am now vacuuming up all the last bits of Primaloft before the little one decides to eat them!  It worked!  Praise the Lord!  Whew... 

Next post... Poggies

Peace to all
Nickie

Friday, November 14, 2008

The Rolling Yurt/Baby Bike Shelter

We are working on developing an insulated rain cover for the Llama. Using some yummy fabrics! Mmmm, makes me drool! eVent and prima loft. :) We managed to get our hands on some lovely slate blue gray eVent. eVent, if you don't know is a highly breathable waterproof/breathable fabric. One of the comparisons we found put it at about as breathable as Schoeller, another one of our favorites. So basically eVent is as breathable as a soft shell, but it's a hard shell. Primaloft has a similar weight to warmth ratio as down, but it does not absorb water. Should be perfect for cold mornings.

Anthony and I were talking about our needs for this winter. I take the older one to preschool early in the morning and some of the mornings have already been about 20 degrees. If I don't want to have to take 20 minutes to bundle the kids, we need to have a bike-mounted warming system. We are trying to design this one so I can just put a coat and a hat on the boys and them be fine in cold morning and snowy weather. That way, when I get somewhere I don't have to unbundle them to go inside. Nor do I have to bundle them up to go outside of the bike shelter. That scenario is possible if we made the yurt/bike shelter too warm for jackets even and then had to bundle them up to walk to the door.

We are working on designing double paned vinyl windows to prevent cold spots and condensation. We are also considering how the shelter will interface with a load vs an empty bike. Currently, the rain shelter just rides up over a load, which is fine as long as most air is sealed out. Another consideration is making sure the sides don't flap in the wind, transferring cold air in and warm air out. This should be an exciting project! We'll post pictures when the project is completed! :)